How to Create Android Application for your website/Blog in 5 Steps

Bangalore: Now a days Online marketing mainly turned into hand held devices Like mobile ,Tabs etc.
so most of the people are using android devices. Here we are going to help you by creating an android application of your blog or website. Most of the Websites and blog have separate mobile templates Once we Logged In/browse from Mobile it will change automatically into mobile view. There you can customize your page as per you web knowledge. Here we are Explaining How we can create an android Application. On click of this application It ill Open your web site in mobile view. No need to go for your Url. Just Install your application there users can browse in your website.


Step 1: Create a Simple Android Application using Eclipse IDE
            If you have not set up the development environment.
            Check this. Android Dev Envmnt Installation
            If you have doubt in creating sample application check this Clcik
Step 2:Open Your res>Layout Folder and open the xml file.
           and modify it like this.

Here In Linear Layout we have created a  WebView because for Listing our Webiste we need to Call this webView. So we need to edit the res>values String.xml file like this.
There you can mention the Application Name what you want to display.
Step 3:Modify Your MainActivity.java Class Like this.
          src>com.android.webapp>
                 your package name.

Its all basic java codes with android libraries. we have created webview object and given our Blog Url and loading it when our application launches.
You can customize it any way you want.

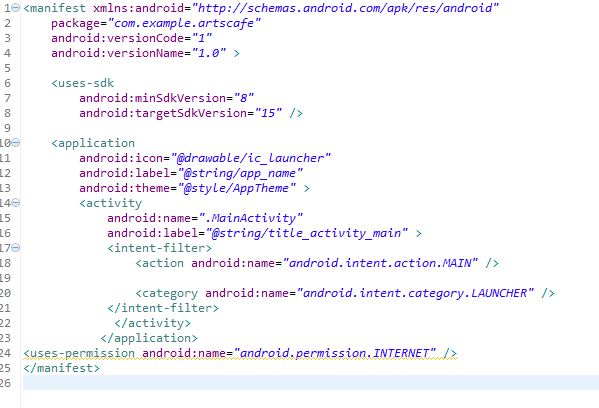
Step 4: Add this Internet accessing Permission code in your AndroidManifest.xml file.
Run your application. It will launch your site in Emulator.


Step 5: Pull the .apk file and host it in google Play.
           How to take APK File Check this link for Detals :Click me

If you have any doubt Comment Here

How to Install Android Development Environment in Eclipse step by step procedure

Step 1:You can Install Android Development Toolkit in eclipse using following plugins.
First Download Eclipse "Download" If you don't have one.
Or Download Latest eclipse  Kepler from here
Launch the Eclipse and set the workspace
Then Click on Eclipse Help Menu
                         Help>Install New Software>
                         Paste this link in Work With field.
                         Link :https://dl-ssl.google.com/android/eclipse/
If its not loading
Just  right side of Work With field you can see an add button give there a name eg:ADTplugin
and paste the above URL there press ok. After that it will list all available plugins,select all and press next  and finish your plugin  installation.

If you are working with proxy network there you will face some problem to download this plugin so
you can download Plugin as Zip file from this location http://dl.google.com/android/ADT-21.1.0.zip
and you can install the plugin by selecting this archive file.

Step 2: Now you have to download Android SDK From here "Download
unzip the android sdk for windows and map it to eclipse 
Mapping SDK to Eclipse Go to Eclipse Window>Preferences>

If you have Installed Android Plugin After General you can see the Android in Left Side bar Select Android
Now you can see a window with title Android Preferences, There you have to select the downloaded ADT or SDK Path,Then it will list all the Android version you have Installed.
If its not Listing anything select the Android SDK Manager from Windows Menu of Eclipse.
and Install all the android Version you want.
Restart Eclipse and check.

Go to Your Eclipse File Menu>New>AndroidProject Menu is there then your Eclipse is ready for Android Development.
Android Plugin Installed Eclipse.

Step 3:
click on android virtual deice manager it will help you to create a virtual android device (emulator).
configure it as per your project version,Its used  for running your project in android device.

So go and Create Your First android Application
check this for eg :MyFirst Android App
Fore More Queries Comment to Us

Android Application Development "Hello World Application"

Bangalore: Android is one of the most used Mobile O.S ,so today we are going to discuss about some Android Application Development. For Every applications development starting with a Hello World application. SO today we are going to create a Hello world Application in Android.
Tools Used: Eclipse with Android Plugins Installed. (Hope That All of you have Android Development Environment).
or else Read This
So I am going to explain it step by step.
Step 1: First go to File of Eclipse click New Project there Select Android Project, Then it will open a popup There you have to give Project Name give "Hello World" or any other Name you like.
Then  It will open next pop up there,It will list all the Android Versions you have select any version you needed  for your project,here I have selected Android 2.3
Then you have to provide a package for your project,because as per this package name you can build it and upload it in Google paly. so I have given this name as package name "com.hello.world"
Step 2:  So Your Project will be created and you can see that it in your Package Explorer.

So every android application will have the following package format.
In which src folder contains the java source files.
res  folder contains the xml files,means user Inter face files
Its just like Aspx,code behind c# or jsp ,java kind stuff.

Step 3:Android Manifest.xml is the configuration file there we are configuring every activity and Launching files etc.

Step 4: So In our Application UI part we have one Button and One Text Field So while our Application loads  only Button is visible,after clicking the button it will show that hello world text.
So here is our main.xml code its in res>layout.
 step 5: So In our Src>HelloWorldActivity.java file we need to write on click action then we can see the expected out put.

step 6: We have to create a button object with id "btnclick" then only we can call the on click event.

Button btn = (Button) findViewById(R.id.btnClick);
it will create the button object.
so on btn click event we can make the invisible button into visible one.
check the below code then you will get more clarified.
Further question you can write to us.
check the imported packages and code.
Finally you will get this result in emulator on button click.


Final Result.